User manual
1. Get you capacimeter ready
The capacimeter have two ways to measure capacitances, whether they are all connected to a common ground or floating capacitances.
1.1 Grounded connection
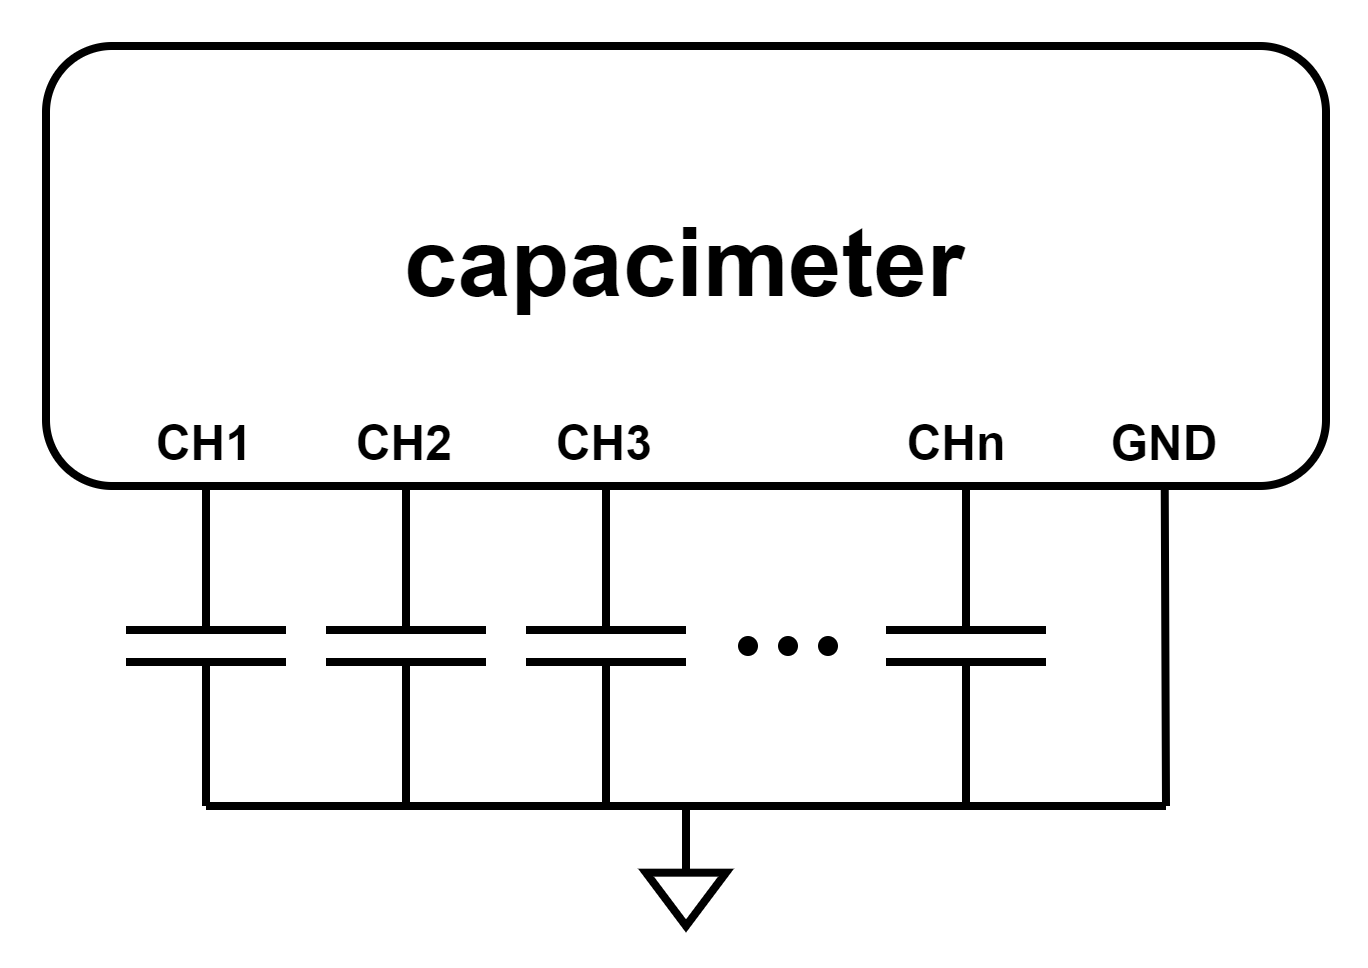
Capacitances are said to be "grounded" if they are connected according to the schematics shown below. Set the connection parameter in the configuration file as "grounded".
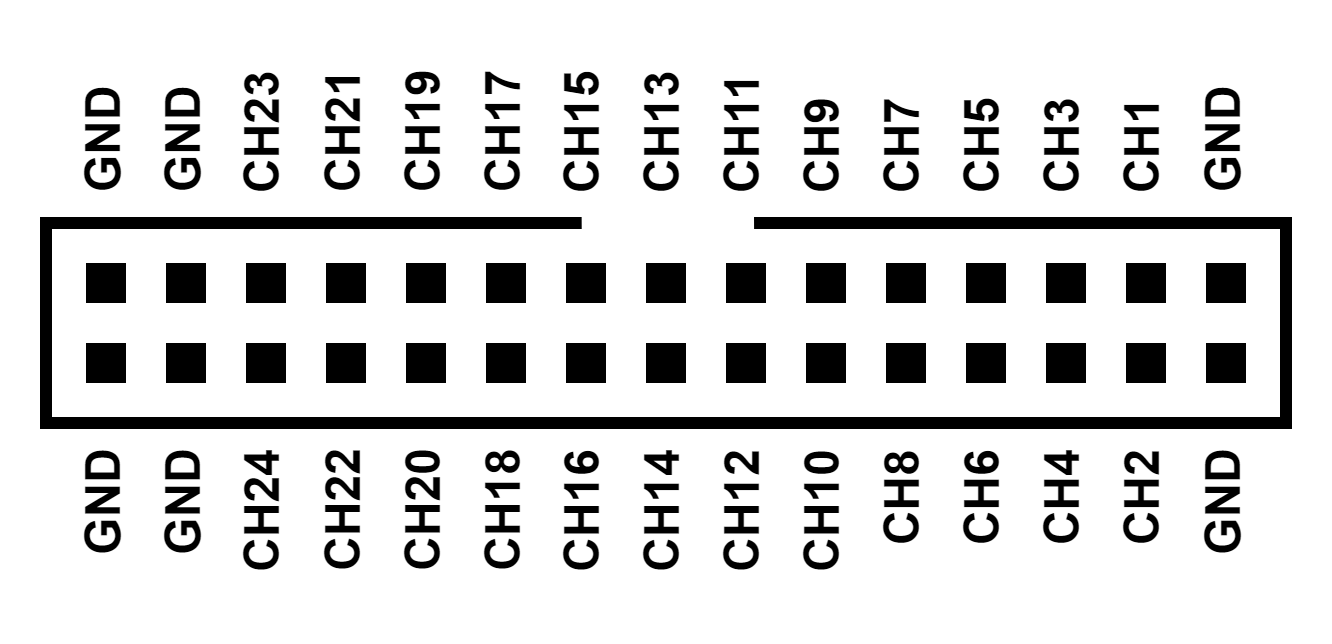
In this setup, the pinout of the capacimeter's connector is as depicted in the figure below (front view). When using "grounded" connection configuration, 24 channels are available as only one pin of the capacitance needs to be connected to the capacimeter. Any of the connector's ground pins can be used as reference because they are all connected together within the device.
1.2. Floating connection
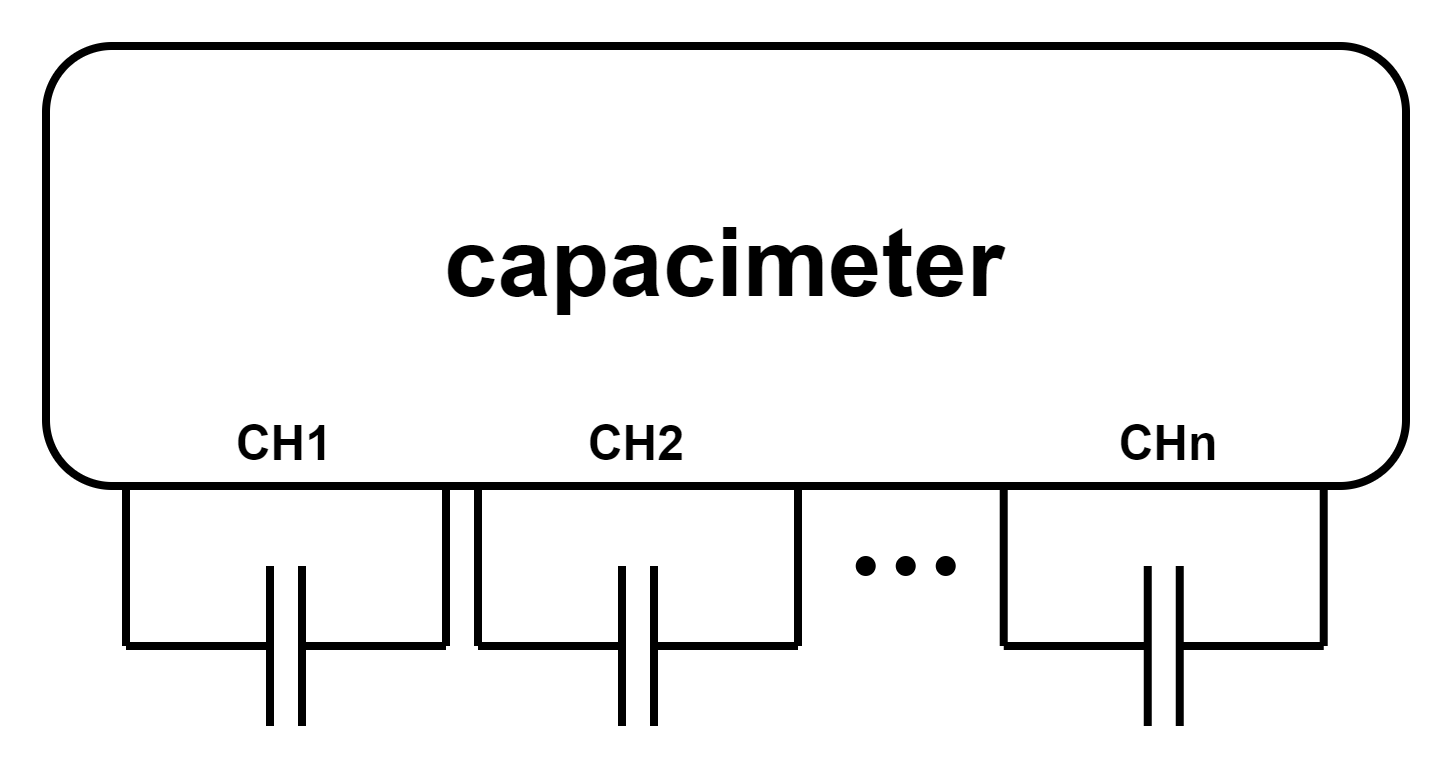
Capacitances are said to be "floating" when they are not (or must not) be connected to ground. Set the connection parameter in the configuration file as "floating". In this configuration, two pins of the capacimeter are needed to measure one capacitance which must be connected according to the schematics shown below.
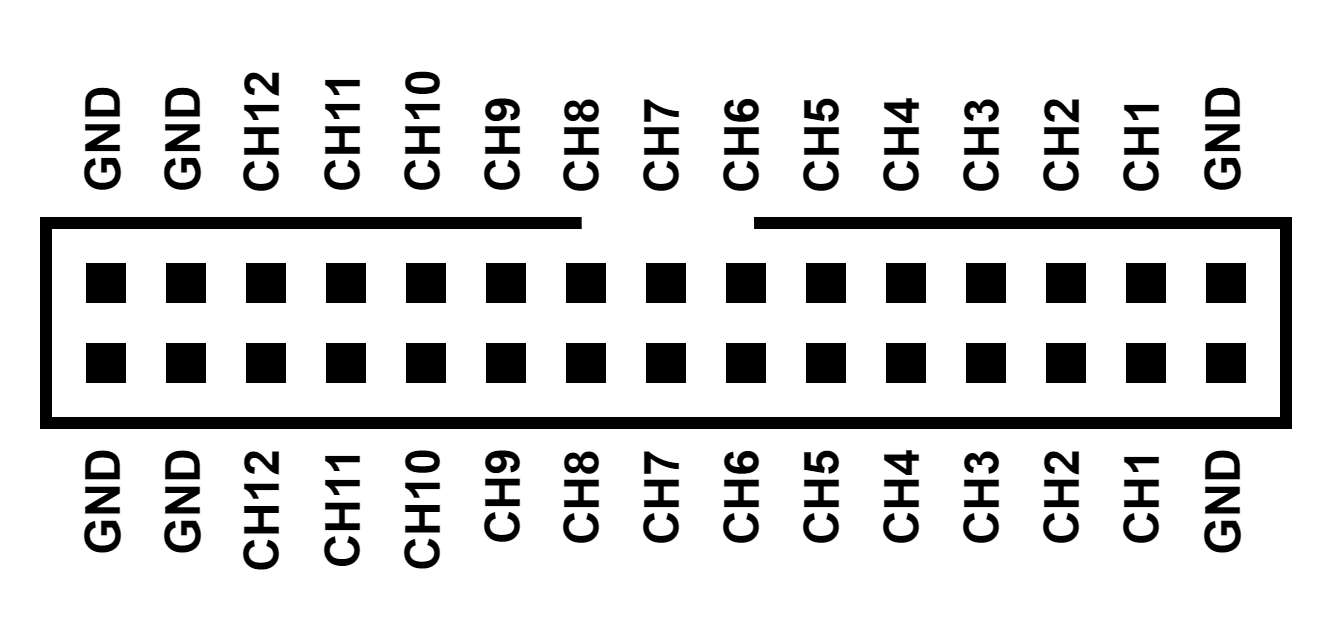
When the capacimeter is set to "floating" connection mode, the pinout of the connector adheres to the diagram depicted below. It offers up to 12 channels, and there is no need to connect the ground pins.
2. Let's measure
2.1. The capacimeter with the Contextual Instruments ecosystem
Simple and easy. Start a measure with the LIVE MODE
2.2. The capacimeter as a standalone device
You still can use the capacimeter as a standalone sensor with its SD card.
2.2.1 Create your configuration
The device consistently operates when a micro-SD card is inserted into its slot. Compatible micro-SD cards include SD, SDHC, and SDXC up to 2 TB in capacity. The micro-SD card can be formatted using FAT, FAT32, or exFAT file systems.
Prior to inserting the micro-SD card into the device, create a configuration file at the root of the micro-SD card named config.json.
Enter a valid configuration in the config.json file following the provided example below,
{
    "capacimeter": {
        "filename": "capacimeter",
        "sampling_interval": 50,
        "channel_number": 24,
        "connection": "grounded",
        "export": {
            "ble": true,
            "sd": true
        }
    }
}
- filename: The designated name enclosed in quotation marks for generating CSV data files on the micro-SD card. The initial file created will be titled example_capacimeter_filename.csv, with subsequent files named example_capacimeter_filename_001.csv, example_capacimeter_filename_002.csv, and so forth. You can save up to 1000 CSV data files under the same filename.
- connection: Specify "grounded" or "floating" to indicate whether the capacitance being measured is connected to ground or left unconnected. Refer to the following section, "Connecting the capacimeter," for further details.
- sampling_period: The sampling period, measured in milliseconds, is adjustable from 2 (equivalent to 500 samples per second per channel) to 10000 (equal to 0.01 samples per second per channel). The minimal authorized value depends on the number of channels selected. Please refer to Table A for minimal values. If ble is set to true, the minimal interval is 50 ms (20 sps) whatever the number of channels is selected.
- channel_number: The number of channels to acquire. In grounded mode this can be up to 24 while in floating mode, the maximum number of channels is 12.
- ble: Configure as true or false to determine whether the data should be sent via the Bluetooth Low Energy wireless interface. If enabled, the software application may be used to collect data that will be sent on the dashboard for easy access.
- sd: Configure as true or false to determine whether the data should be written to a CSV data file on the micro-SD card or not.
Table A : Minimal sampling interval vs. number of channels
| Number of Channels | Minimum sampling interval | Equivalent sampling rate |
|---|---|---|
| 1 | 2 ms | 500 sps |
| 2 | 3 ms | 333 sps |
| 3 - 4 | 4 ms | 250 sps |
| 5 - 8 | 5 ms | 200 sps |
| 9 - 12 | 6 ms | 167 sps |
| 13 - 16 (grounded only) | 7 ms | 143 sps |
| 17 - 20 (grounded only) | 8 ms | 125 sps |
| 21 - 24 (grounded only) | 10 ms | 100 sps |
2.2.2 Start and stop the capacimeter
When no lights are visible from the RGB LED of the capacimeter, it indicates that the device is either in SLEEP state or the battery is depleted. In the former case, a brief press on the button will awaken the capacimeter. In the latter case, a brief press on the button will make the RGB LED blink red for 1 second, indicating the low battery.
When the capacimeter is awakened, the RGB LED will turn red if battery is inferior to 20%, and will otherwise blink green, indicating an IDLE state, and will start advertising on Bluetooth Low Energy so that the software application can connect to the device.
Measurement can be initiated by a short press on the button, or via the app. The capacimeter will switch to the PREPARING MEASURE state, and the LED will turn blue. The capacimeter will now read the configuration that is stored in the config.json file on the micro-SD card inserted into the device. This configuration may be updated manually or via the software app, please read the software application documentation for more information.
If no micro-SD card is inserted, or if the configuration cannot be read or is incorrect, the RGB LED will blink red, indicating that the system has entered an INVALID state. Bluetooth communication stops, and after 5 seconds, the device returns to SLEEP state.
If the configuration is valid, the capacimeter enters the MEASURE state. The device acquires data from all channels at the sampling period rate. If the sd parameter was enabled in the configuration, a new CSV data file is generated on the micro-SD card and the acquired data is written on the SD card. If the ble parameter was enabled, the acquired data is sent to the application if it connected to the device.
When the capacimeter is in the MEASURE state, a brief press on the button will stop measurements. The capacimeter will then return to the IDLE mode. If BLE was enabled, the measurement can also be stopped from the application.
If the micro-SD card is removed during the MEASURE state, if it becomes full, or if an error occurs during data writing to the CSV data file, the system will keep acquiring data, and send it over BLE if it is enabled.
If BLE connectivity is lost, the system will also keep acquiring data, and writing it to the SD card. It is possible to reconnect to the device and acquire later data.
Performing a long press on the button will return the device to SLEEP state, from whatever state it was before. This will also happen if the onboard battery's percentage falls under 10%.
Recharging the battery
Plug the capacimeter into a computer USB port or a wall charger using a USB type C cable to recharge the battery. The green LED adjacent to the USB-C connector will illuminate upon detecting a suitable power source. An orange LED positioned next to the green LED will activate during the charging process and will switch off once charging is finished.
Reseting the device
Unplug the Capacimeter from any external power source by simply disconnecting the USB cable if it is connected. Then, press the reset button using a small pin.